Here’s How to Create and Delete Hard Disk Partitions in Windows 11
A hard disk partition is a term related to a PC or laptop computer device. This hard disk partitioning is done to manage a hard disk to be more effective. The hard drive itself is a hardware which functions as a storage medium.
Usually, if the PC or laptop used is new, this hard drive is only integrated into one drive. Therefore, partitioning the hard disk is quite important so that the system can separate the Windows installation from games, programs, or other files. In addition, your PC or laptop will also operate better.
In fact, you don’t have to worry about your important data being deleted if you reinstall Windows. Because, your data is separated from the system or is on a different drive.
Then, how do you create hard disk partitions in Windows 11? Actually, to create hard disk partitions in Windows 11 is not much different from how it is done in Windows 10.
Before creating hard disk partitions, there are things you need to pay attention to first. One is you have to do back up or back up your important data or files. This is done to anticipate the possibility of data or files being lost or deleted.
If so, please read this article to the end. Because, in this article, we will discuss how to create hard disk partitions in Windows 11. The goal is to divide or reduce the capacity of the drive and create a new drive. This article will also explain how to delete previously created partitions.
How to Create Hard Drive Partitions in Windows 11
To create disk partitions, you don’t need any additional software. This is because the operating system already has a tool for partitioning called Disk Management. For a more detailed method, please refer to the following steps.
- The first step that must be taken is to open the Disk Management program in Windows 11.
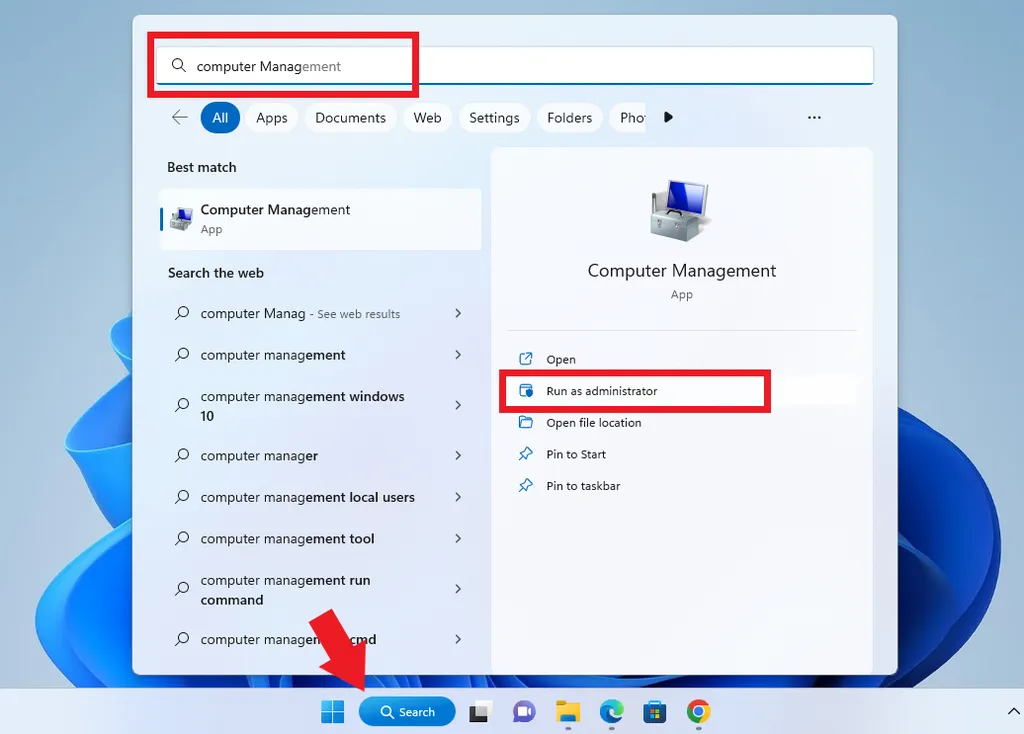
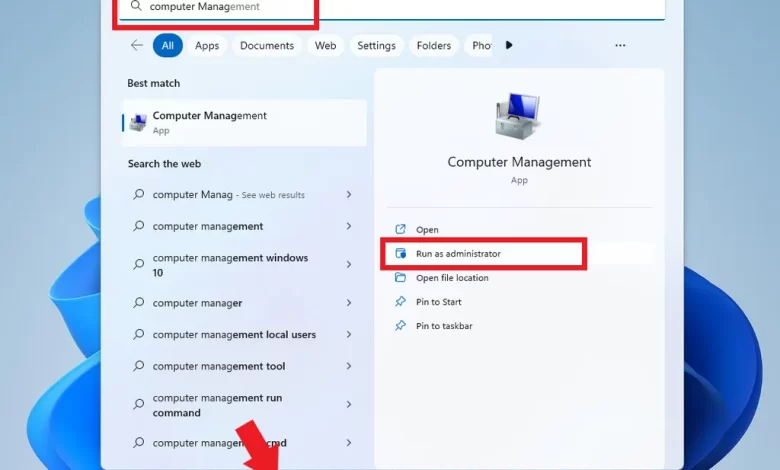
- The trick is to press a button “Start/Windows” or just type “Computer Management” in the search field provided.
- Select “Run as administrator” to open it.
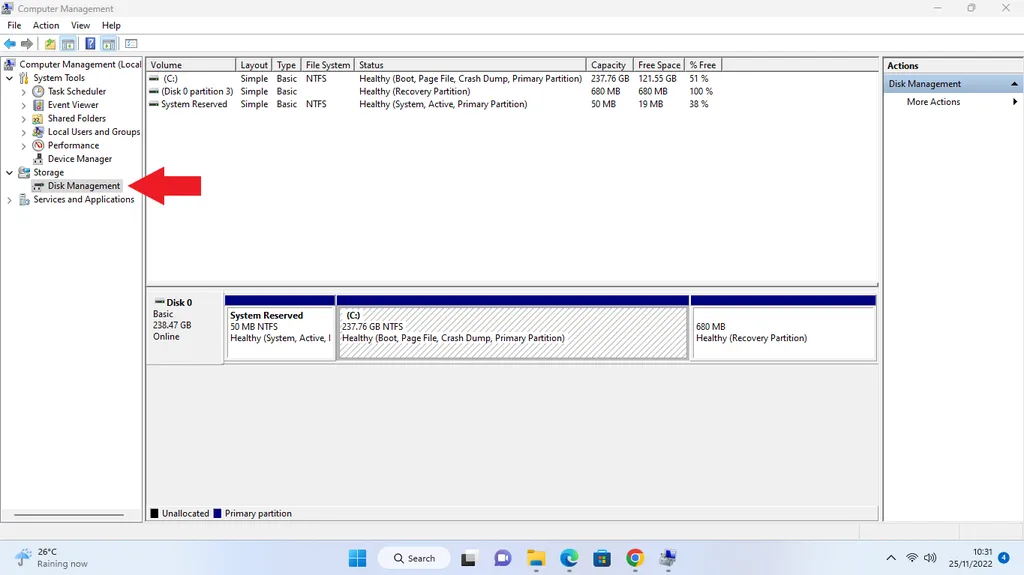
- Inside Computer Managementplease choose “Disk Management”.
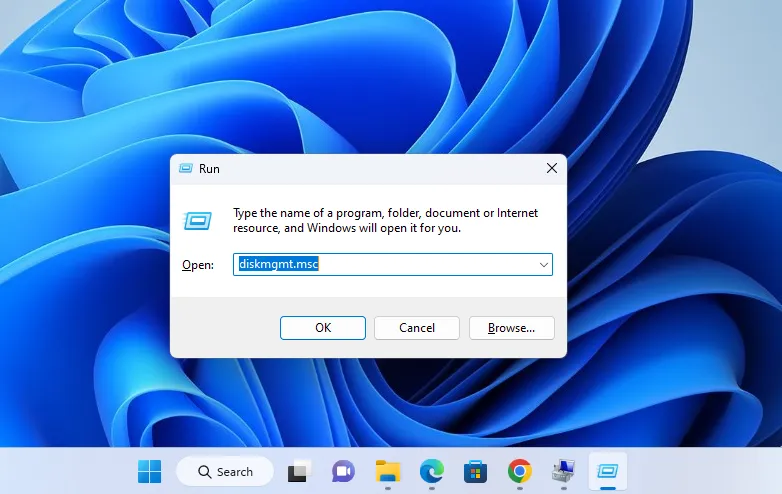
- Besides opening Disk Management through Computer Managementyou can also directly open it via shortcut “Windows+R” on keyboard.
- After that write “diskmgmt.msc”then press Enter or OK.
- Before creating a hard disk partition, you must first reduce the capacity or volume of the C drive. For information, this C drive will later become the main partition of Windows.
- To reduce the capacity or volume, right click on drive Cthen select “Shrink Volume”.
- In the window that opens, you can specify how much the capacity or volume of the C drive will be reduced. The capacity or volume is determined by the value in MB units. Therefore, if you want to subtract 100 GB, you can multiply it by 1,000, so the number written is 100,000 MB.
- Enter the total capacity earlier into the column next to the text “Enter the amount of space to shrink in MB”.
- When finished, please press the button “Shrink”.
- After that, a box with a predetermined capacity will appear. However, the box has a caption “Unallocated”.
- Right click on the box, then select “New Simple Volume…”.
- In order to use the entire capacity or volume of a specified drive, you do not need to change the value, unless you want to create multiple hard drive partitions.
- After that, please press “Next” to continue.
- The next step is to determine the letters for the name from drive the. Windows will automatically name it with the next letter, but you can choose another letter if you like.
- Please press “Next” when finished selecting.
- As a final step, you must set the format and name of the newly created partition. To set it, please select “Format this volume with the following settings:”.
- After setting it, please add a tick on “Perform a quick format”.
- Then press “Next” to finish it and press “Finish”.
After the hard drive partition creation process is complete, the created partition will automatically appear in File Explorer. Now, the drive on your Windows 11 PC or laptop has a total of two. So, your PC or laptop will operate better than before.
Another question that might arise in your mind is whether the disk partition in Windows 11 can be deleted? The answer is yes. See how to delete hard disk partitions in Windows 11 below.
How to Wipe Hard Drive Partitions in Windows 11
Apart from creating new partitions, you can also delete hard disk partitions that you have previously created. Before deleting the partition, please note that the files or data on the partition will also be deleted. Therefore, it is important to back up first so that nothing is deleted.
If you have already backed up, please refer to the following steps.
- The first step you should take is to open “Disk Management”. You can open it using the steps mentioned earlier.
- You can open it via Computer Management or use shortcut on keyboard.
- After Disk Management successfully opened, find the disk partition you want to delete.
- Then, right click on the partition and select it “Delete volume…” to delete it.
- If there is an alert to confirm the action you took, please select it “Yes” to agree.
- After successfully deleting it, the deleted partition will display the capacity or volume and have a name “Unallocated”.
- The next step you have to take is to move that capacity to another partition.
- The trick is to right-click on the partition to be added, then select it “Extend Volume…”.
- Next, select the highest recommended value and vote “Next” to continue until the process is complete.
- After everything is done, please click “Finish” as a last step.
So, that’s how you can create a new partition in Windows 11. The method is quite easy because it is not much different from how it was done in WIndows 10. Before creating a new hard disk partition, it is recommended to do back up or back up beforehand to prevent loss of important data.
You can also easily delete the partitions that have been created. However, just like the manufacturing process, backing up important data or files is highly recommended to be safer. Good luck.