How to Enable, Pair, and Remove Bluetooth in Windows 11
Bluetooth is one of the connectivity that is still often used and needed. In addition, Bluetooth is also a feature in connectivity that is important and must be present on a smart device. In fact, almost all the latest PCs or laptops definitely have this built-in Bluetooth device.
The function of the built-in Bluetooth is quite helpful in facilitating every activity of its users. One of its functions is being able to connect two devices within a range that are close to each other. In addition, built-in Bluetooth also functions to connect devices with Bluetooth-based headsets to listen to music or play games.
Before using bluetooth, of course you have to activate it first. The method is not too difficult and quite practical even for PC or laptop devices. Then, what about a PC or laptop that already uses the Windows 11 operating system?
Some of you may still be confused about how to activate Bluetooth in Windows 11. Therefore, we have summarized several ways to activate and pair Bluetooth in Windows 11, as well as disconnect or remove previously connected devices.
How To Enable Bluetooth In Windows 11
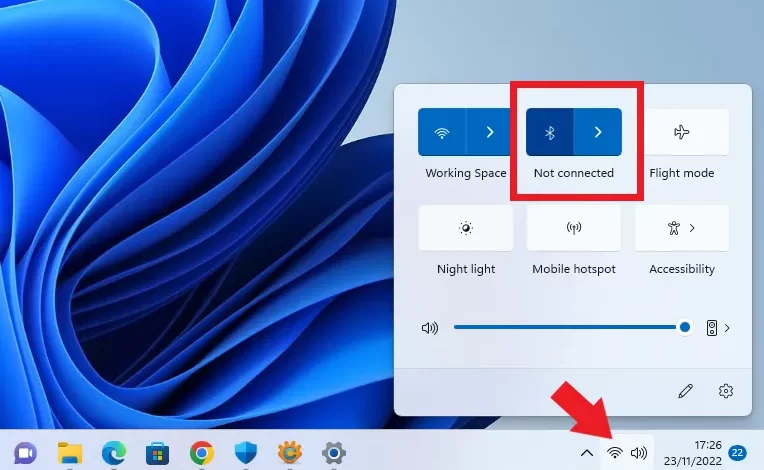
The way to activate Bluetooth in Windows 11 is quite easy and fast. One of the easiest and most common ways to do this is through connectivity on the taskbar. Usually, Bluetooth is placed along with the network connection and the speaker on the bottom right. To be clearer, please refer to the following steps.
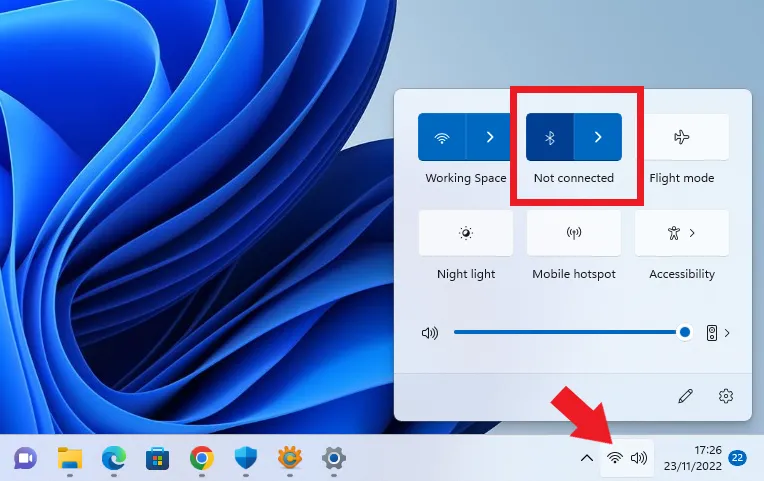
- The first step that must be taken is to press the WiFi connectivity icon and the speaker on the bottom right.
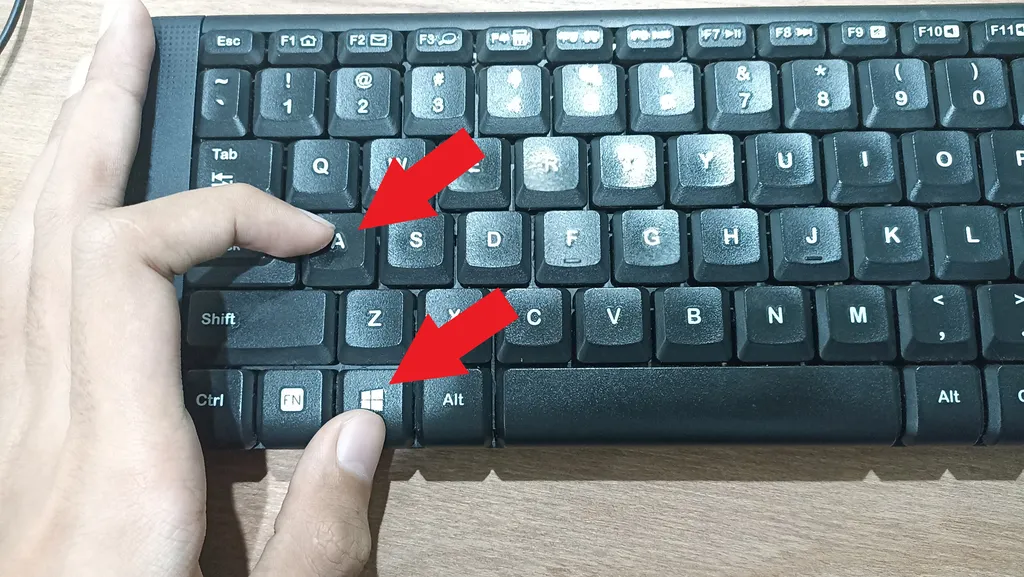
- To make it even faster, you can also use the shortcut key or sort cut by pressing Windows key + A on keyboard.
- After that, several menu options will appear to choose from, starting from WiFi, Flight Mode, Nightlight, Mobile Hotspot, Accessibility, and Bluetooth.
- To activate it you just need to press the Bluetooth icon until it turns blue.
Apart from activating Bluetooth via the Taskbar, you can also activate it via the available Settings. How to? Check out the following steps.
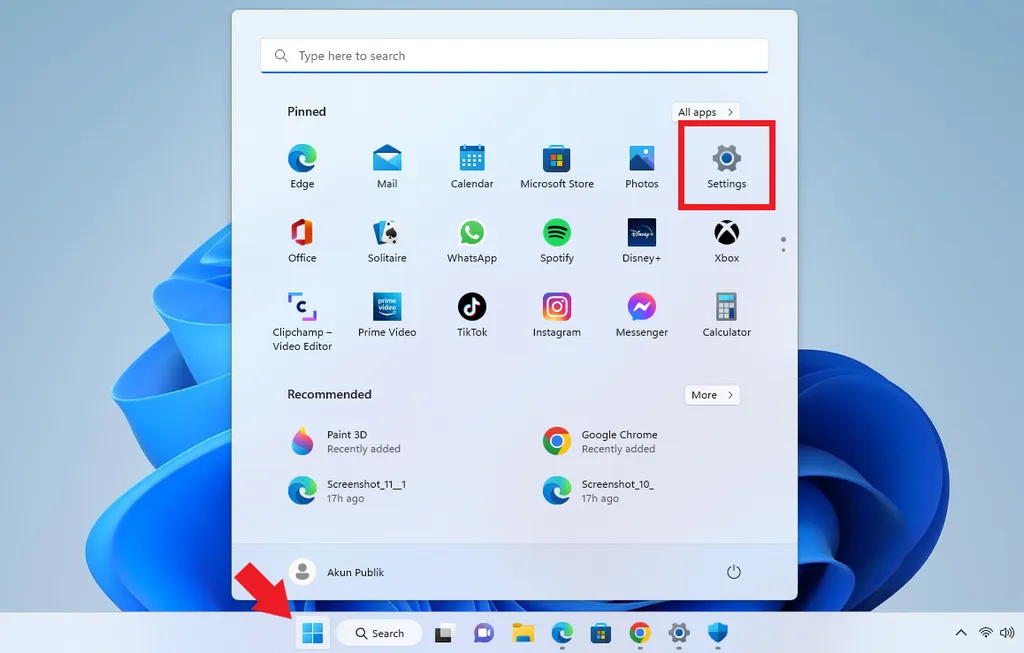
- The first step is of course to open the menu “Start/Windows” and select an application “Settings” which is there.
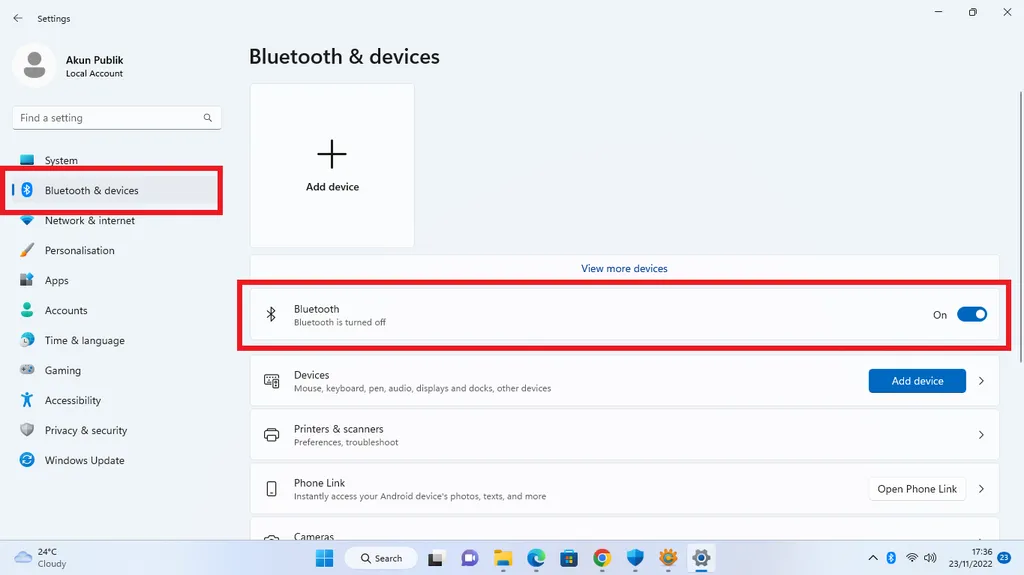
- After that, select the menu “Bluetooth & devices”.
- On the Bluetooth & devices menu, press toggle next to the inscription “Bluetooth” to activate it.
- If toggle it has changed to blue and reads On, then your Bluetooth is active. Usually, in the Taskbar section there will also be a Bluetooth icon when it is just activated.
If Bluetooth on your PC or laptop has been successfully activated, then you can already pair your device with other devices. The condition is that other devices to be connected must also activate their Bluetooth first.
Then, how do you pair Bluetooth with other devices? Here’s how you can pair Bluetooth with other devices easily and quickly.
How To Pair Bluetooth On Windows 11 With Other Devices
After successfully activating Bluetooth, you need to pair the Bluetooth so it can connect with other devices. The way to do it is also not too complicated. For more clarity, please refer to the following steps.
The first step that must be taken is to activate the Bluetooth of the destination device and bring it closer to your PC or laptop.

- Then, please open “Settings” through the menu “Start/Windows” as usual.
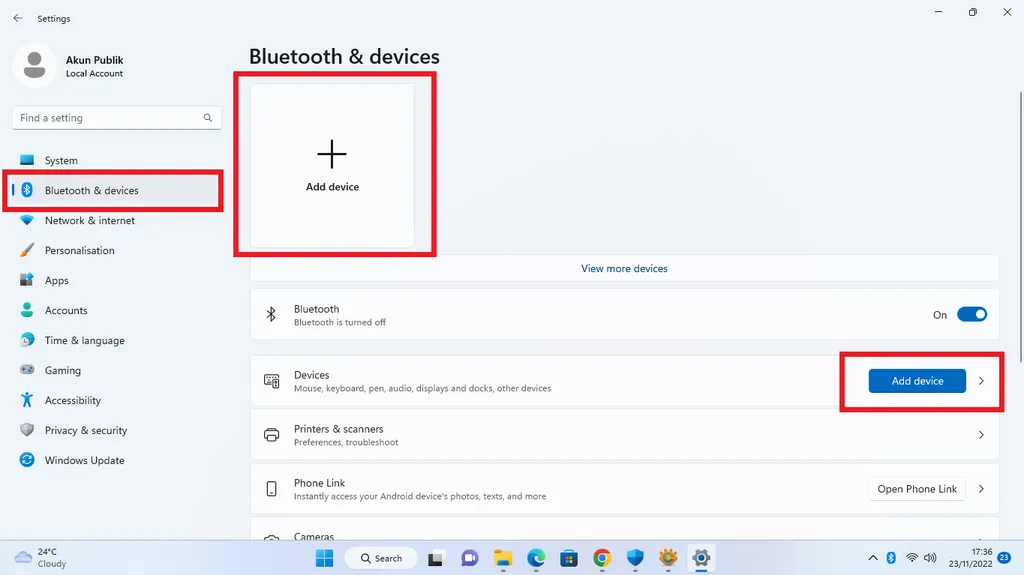
- Select the menu “Bluetooth & devices”.
- After that, press options “Add device” which has a logo “+” large at the top or the button next to the menu “Devices”.
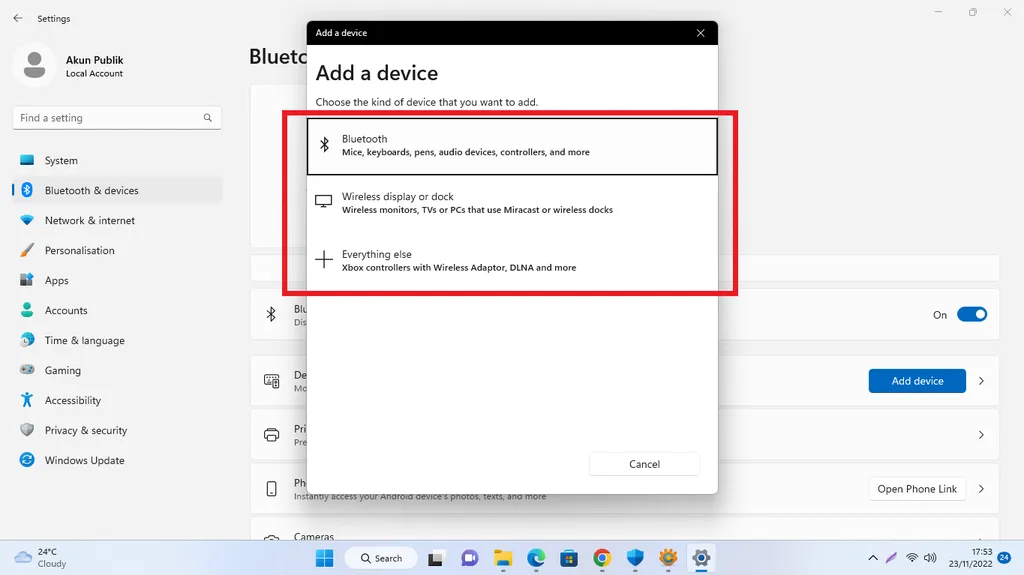
- In the Add device window that appears, you can choose what type of device to connect to your PC or laptop.
- You can connect it to Bluetooth mic, keyboard, pen, audio device, controllersetc.
- You can also connect it to Wireless display or dock form Wireless monitorsTV, and so on.
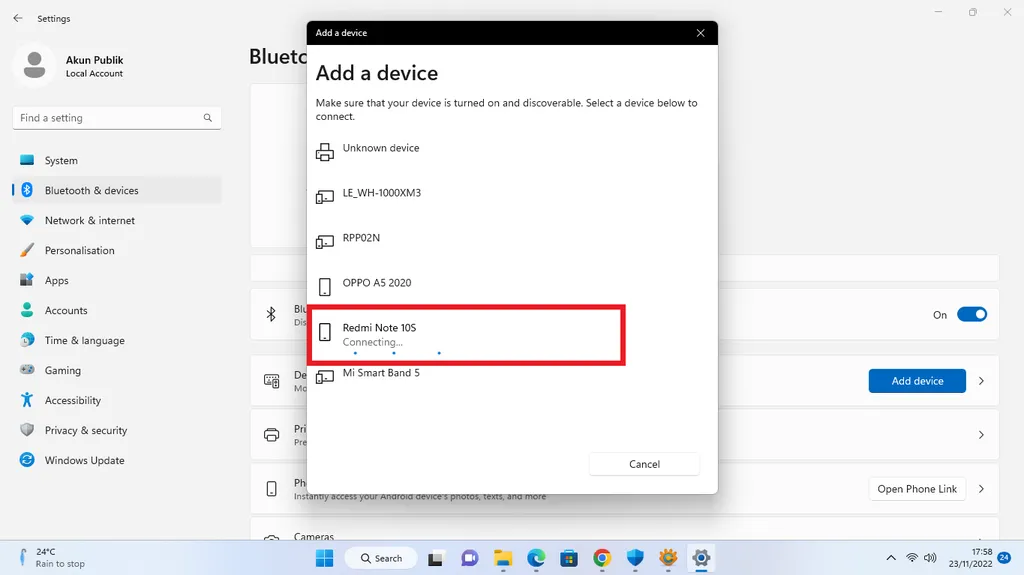
- After that, please press Wifi from the destination device.
- Wait until the device is installed.
For information, Bluetooth version 5 and above can connect to several devices at once. For example, to connect with a Bluetooth mouse or a Bluetooth keyboard at the same time.
As for audio devices, Bluetooth 5 makes it possible to pair more than one device, but will only be able to play audio from one source at a time.
If you want to delete devices that have been connected before, the way to do it is also quite easy. The following are ways you can delete connected devices.
How To Remove or Disconnect a Bluetooth Device In Windows 11
In this case, previously your PC or laptop device was connected to other devices via Bluetooth. So, to remove the device from the list of connected devices, you can follow the steps below.

- The first step to do, of course, is to enter the menu “Settings” which can be accessed via the menu “Start/Windows”.
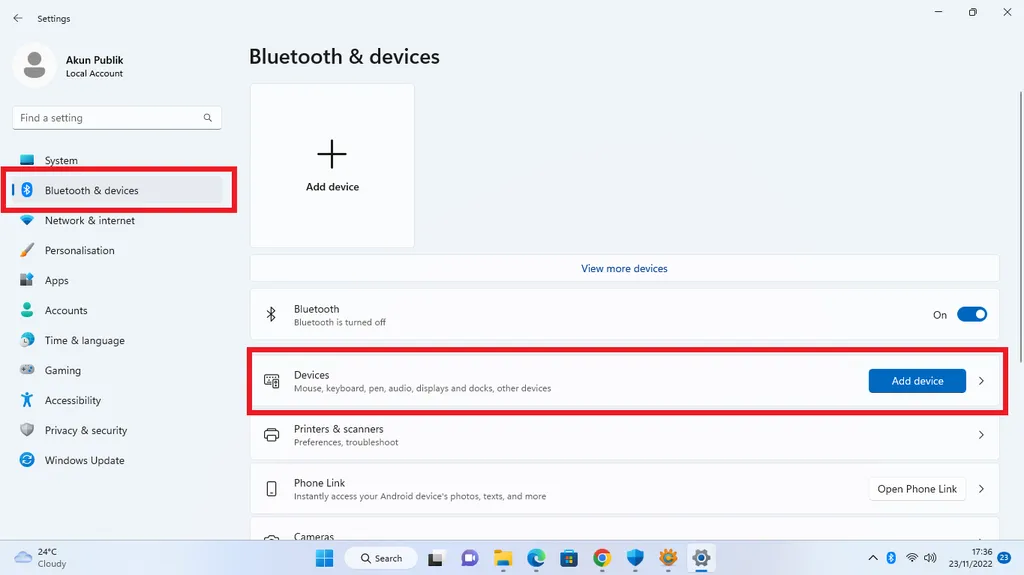
- After that, please select the menu “Bluetooth & devices”.
- If it’s already open, please press the column on the menu “Devices”.
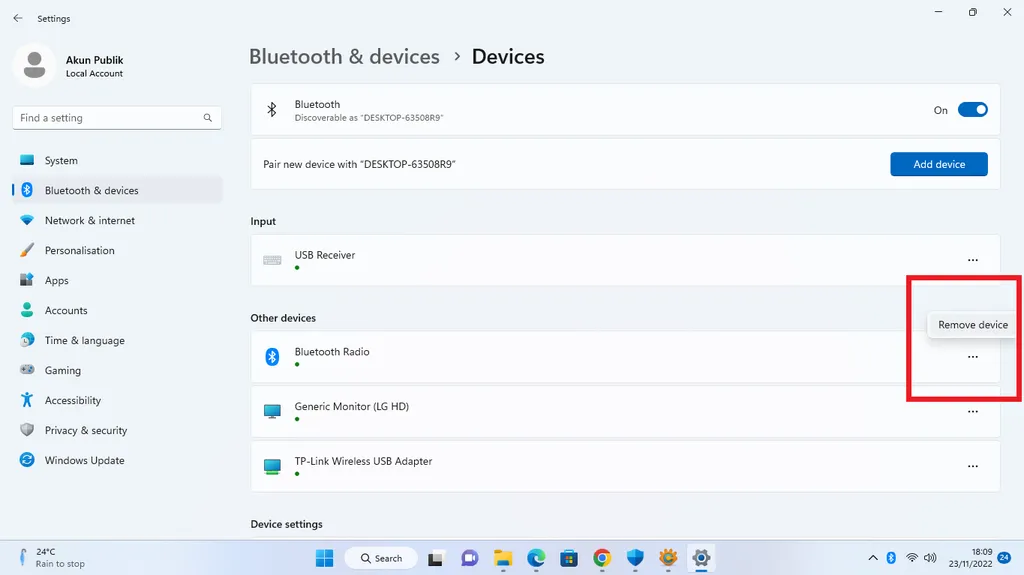
- Inside there are several devices that have been connected to your PC or laptop before.
- To delete it, you just need to press the three dots next to the name of the device you want to delete.
- Then choose “Remove” to remove the device from your PC or laptop.
- When finished, the device is no longer connected to your PC or laptop and you have to pair it again if you want to connect.
So, those are some ways you can do about Bluetooth in Windows 11. These methods can be used to activate and pair with other devices. Apart from that, you can also delete devices that have been connected to your PC or laptop again. Good luck.
